Tuesday, October 11, 2011

Ha Bisky!


Upper Lid (Over Nyx Milk)
Duct: Madd Style Cosmetic's Ripple
Inner/Outer Lid: Virus Insanity's Ocean Mystery blended into Scaredy Cat Cosmetic's Chakra
Orbital Bone: Madd Style Cosmetic's Shiva
Highlight: Madd Style Cosmetic's Dr. Rockso

Lower Lid
Scaredy Cat Cosmetic's Chakra blended into Madd Style Cosmetic's Outlaw Star

Madd Style Cosmetics Dazzle Dust all over EVERYTHING. Because it is so kick ass.


Wednesday, June 22, 2011

I'm Baaack!

Hey everyone! How have you all been! I am officially back from my hiatus! (I graduated from the college I was at, and have been working out jobs, moving, and everything else! I've been a very busy Eige!)

Anywho! I'm breaking my hiatus with some nerdy makeup. Over my hiatus time, I took  a few hours out and beat a game that I had been DYING to beat: Portal 2. I am in love with the Portal games; so much that I wanted to do Portal themed makeup. :3


Yes, yes, I know. My nerd is showing. 


I USED:
Madd Style Cosmetics Boognish (orange)
Madd Style Cosmetics Dr. Rockso (white)
Virus Insanity Eyeshadow Ocean Mystery (blue)
Madd Style Cosmetics Ripple (light blue)
and 
Madd Style Cosmetics Spooky Girl (black)


Saturday, May 7, 2011

Maleficent: Win? Fail?

Well, today I set off on my journey to explore the world of cut creases. Within seconds, I realized I wasn't very good at it. I kept on playing, and I came out with something pretty darn kick ass looking. :O
*note: after I realized that this look was NOT going to be a good candidate for a cut crease, I blended until my little self was happy with a different look, so I didn't have to waste any makeup!


Lets see. I used:
Madd Style Cosmetics' Acid Bath
Madd Style Cosmetics' Ecto Cooler
Beauty From the Earth Limeade (OMFGI LOVE THIS)
Madd Style Cosmetics' Mondo
Urban Decay Polyester Bride (highlight)


I adore the way the greens really BOUNCE off the purple. it made my brown eyes actually look brownish rather than black!


Coming up this weekend: How to Make Lipstick-Style Color from Your Pigments

This is a preview!

Next in my line of lip-color-related tutorials is making lipstick-style lip color from your pigments!
While practicing my organization and colors to use, I came across this gem: Virus Insanity Eyeshadow's Love Bite as lip color.... and figured I would feel guilty if I didn't share. :O
 *I accidentally labelled it as "Love Bites" - that is a typo! its actually called Love Bite. :)

...Enjoy!

 *Love Bite as a lipstick-style gloss

Love Bite as a MEGA glossy gloss!
*sorry for the blurry picture!

I need to know a few things before posting the tut - what color would you like to see appear in the next tutorial?

Sunday, May 1, 2011

Quick Tip: Refresh Your Hair Color


If you have fabulously funky hair, say... a whole head of bright green... you know what it is like to have your hair fade, and fade quickly. 

Try mixing in some left over dye into your shampoo for a quick refresher to your hair's color. Since I only have streaks... I occasionally take a little bit of purple dye and brush it in with a toothbrush a few minutes before I shower. :)

Friday, April 29, 2011

How To: Making Opaque Lipcolor from Your Favorite Pigments!

Hello all! I hope you can all forgive me for my absence, it is approaching finals week... and I am less then a month away from graduating from my current college. eep!! Needless to say, I have been busy!

Alright ladies, remember theses looks?


This is one of my absolute favorite techniques for applying outrageous lip color or adding a little bit of spark to any look. I generally use 3 different techniques for applying color to my lippies, but this technique is my absolute favorite for applying OPAQUE color. Now, you don't neccessarily have to do this with a "loud" color as I tend to do, you can do this with red, pink, etc. 

For this tutorial you will need:


The pigment (or pigments) of your choice. For this tutorial, I will be demonstrating how I concoct my sexy black gloss, as per multiple requests!! <3

A brush for application. (a lip brush would work best, but I prefer using a concealer brush!)

Toothpicks, or something for mixing the gloss. The back end of a makeup brush works too!

If you plan on making more than one wear's-worth of gloss, a standard pigment pot works great for storage. For this tutorial, I used a standard 3 gram jar. For more information on how to "recycle" your empty pots, and sanitize them properly, see Krissy's guide here: http://www.facebook.com/note.php?note_id=197384006957791

Lastly, the gloss of your choice (not pictured). For this technique, I PREFER to use sticky glosses. Now, I know some of you just cringed in your seats. Why do I prefer the thick and sticky type? For me, I have found that the pigments mix more thoroughly and covers a lot more opaque than otherwise, and stay quite a bit longer. If you use a thinner gloss as your base, you might have to apply much more than you would usually wear to get the coverage as seen in my photos. :)

Let's get this party started.


Fill your clean pot with the gloss of your choice. I filled mine about 3/4 full. For this tutorial, I used a mixture of Victoria's Secret Beauty Rush Gloss in Sugar Rush, a FABULOUS clear sparkling gloss. For those of you that are familiar with the VS glosses, you know that these things are thick! I also use a tiny bit of Rimmel's Twinkle Pink gloss to add a little bit more sparkle. 

Pink you say? yes. Why? 
Well, I will be adding black to the gloss, it will overpower the pale pink. This same thing works with colors other than black too. If you have a highly tinted gloss, it will tint the end result as well. You can use this in your favor! For example, if you want a really deep red, use a red gloss in tandem with red pigment!


For this tutorial, I used my favorite black for gloss: Madd Style Cosmetics' Spooky Girl. O.O 
so. smexy.


Add a fair amount of pigment straight to your gloss. 


..... and if you are horribly clumsy like me, I would suggest using a brush to push it into the pot. ;P


This is about how much pigment I add to the gloss base. Of course, the more pigment you add, the more opaque your gloss will become. Since I prefer the black to be SUPER opaque, I generally add about half to 3/4 of a teaspoon of pigment. (Keep in mind that this will fill a 3g pot.)


Once your pigment is on the gloss base, mix 'er up! I used a toothpick, but the end of a brush works well too! To be honest, that is what I usually do.... but I wanted the ease of throwing the toothpicks away this time :)
From here, you can add gloss or pigment, glitter or what-have-you until your gloss is what you are looking for. I added just a *touch* of Madd Style's Dazzle Dust. 

Application


For application, I LOVE using a concealer brush. I like that I can have good control over tight lines. I do own a lip brush, but it *is* kinda crappy. I have also found that my concealer brush blends colors and gradients much better too! (video tutorial to come!)

This technique is not as long-wear as some other techniques I am going to share with you, but it is certainly my favorite for crazy, kick ass lips! Reapply gloss as needed. :)


And there you have it! As I said, I will be posting 2 more techniques regarding lip color in the near future... watch out! <3

Sunday, April 17, 2011

Feels Good Man!!

Well, this is the "Eige obviously over-contemplates her makeup selection" post. 
This look is inspired by.... my running shoes. yes, I am serious. 


Lately, I have been taking charge of my life. I recently became a vegetarian, and am doing my absolute best to become healthy again. The thing is, I LOVED running, and I am trying by best to get to that point in my life again. So far I have lost almost 10 lbs. total. Feels good man!

Anywho, these shoes represent what I have been doing in my life lately, and the goals that I have been working towards. :P


For this look I used:
UD Primer Potion and NYX Milk & Black Bean bases. 

TOP LID: 
Madd Style Cosmetics' Dr. Rockso (white)
Madd Style Cosmetics' Outlaw Star (hot pink)
and Hard Candy's Black Hole (black)

BOTTOM LID:
Madd Style Cosmetics' Mr. Roboto (silver)


LIPS:
This is a little gloss that I made using Madd Style's Desert Punk! LOVE IT. 


Mini Haul

Sorry I haven't blogged much lately, you ladies still here? I have been ABSOLUTELY weighed down with life lately. *sigh* but here the good thing: I have tons of blog posts in store for you guys. Photos already taken!

I will start here... with my Wal-Mart haul. ^.^


I got myself a new top coat to go over my Crackle polish, and a cheep-o white to go under my Crackle polish. I may be a little obsessed with the Crackle polish. *someone save me!*

Since, ya know, a girl can never have too many blacks, I decided to try Maybelline's black, and Hard Candy's Black. I will do swatches and compare these down the road!

I also couldnt resist Hard Candy's glitter gel. I couldn't resist the blue one: Maniac. I love it so far, I cant wait to do a blog on it. :O

The last thing, the N.Y.C. supa-cheap eyelash curler. Hey - it works! 

Wednesday, March 30, 2011

Getting Your Liner to Last: Setting Your Waterline With Pigment


Howdy Guys! So, those of you that wear eyeliner on your waterline... have you found something that actually lasts? Until last week, I hadn't. I had tried everything under the sun. Nothing seemed to work for me until I discovered this simple trick: setting your waterline with a pigment or shadow. 

Now, for the tutorial, I decided to do black, but you can CERTAINLY use other colors. :)

(This is the first installment of my mini series on EYELINER. Make sure to suggest things you would like to know more about!)

For this tutorial, I used a standard eyeliner pencil and a plain, matte black pigment, and a small shadow brush. An Angled brush may work better for this, but I do not own one at the moment. 


I warn you. This is my first video, thus... not very good. >.<
I sound like a total bitch, but I promise I am not!!


Let me know what you guys think!

Sunday, March 27, 2011

Eige's Organization in a nutshell.


It has been in my head a long time to write up a post on my organization and working space. I went to work on a video I shot for my mini series on eyeliner, but ended up running into issues (which should be resolved by tomorrow). In the mean time, I decided that it would be a good idea to work on this post, since it is really just a virtual tour of my workspace!

I am really curious to see/hear about your makeup work space as well, feel free to leave pictures or descriptions in the comment box!


Alright. For the most part, this is where the magic happens. Now, I have had this desk since I was really little. It started as my parents computer desk back in the 90's. Now, if you know me, I am super into the environment, and super into not throwing anything away. In the 2000's, I painted it black, since it was getting pretty beat up. now, it has paint, nail polish, burn marks, and whatever you can attach to teen-hood all over it. I recently gutted the shelves and the doors to the cabinet to make it work for make up. 

To the left we can see my tacklebox. this is my second upgrade since I really got into makeup. You can also see my brushes and stuff in the cups I got from target. :) To the right, you can see my beloved mirror, a green storage thinger, and my area for all my hair stuff (used to be the cabinets). 


Photo of my brush cup and my mascara/liner/nyx pencil cups. :)


Hiding beside my tacklebox is a Stilla Pallet I received as a gift from my best friend's mother. I don't use it as often as I should, but I still adore it. <3

I got the tacklebox for christmas of this year, but I believe it came from walmart for under $15. It has a center area with trays, a side cubby, two flip up areas on the top of the box, and actually, the creame colored part of the tacklebox opens, yielding more storage.


In each of the two flippy things on the top of the tacklebox (above), I store things by category. On the left side, I store my false lashes, and my false lash glue. My glue exploded, so I had to keep it somewhere it wouldnt leak on anything else. I also keep my pencil sharpeners here, because they get a little messy sometimes too. 

The right side is mainly home to all my loose glitter. Well, most of it. I also had shoved some random samples in this side. 


When you open the creame colored portion of the top of the tacklebox, you find an abyss of stuff I rarely use. I like to think of this area as real storage... Like a box at the top of your closet. :)

On the front of the box, there is a larger storage area with trays, and a smaller cubby whole (below). The cubby originally came with two organizational boxes, but there is additional room. 


This area fits the two boxes, my Sonia brushes, and my Urban Decay Pallet. The top left photo shows the area with the "door" closed, and the second with it open. 

The two storage boxes that came in the cubby are relatively small, and are sectioned into narrow areas. I havent really found anything to go in here, save for when i travel. So, for now, i keep Qtips and my misbehaved glitter... (tube broke... aka glitter explosion), but, as i mentioned, i am not one to throw something away!


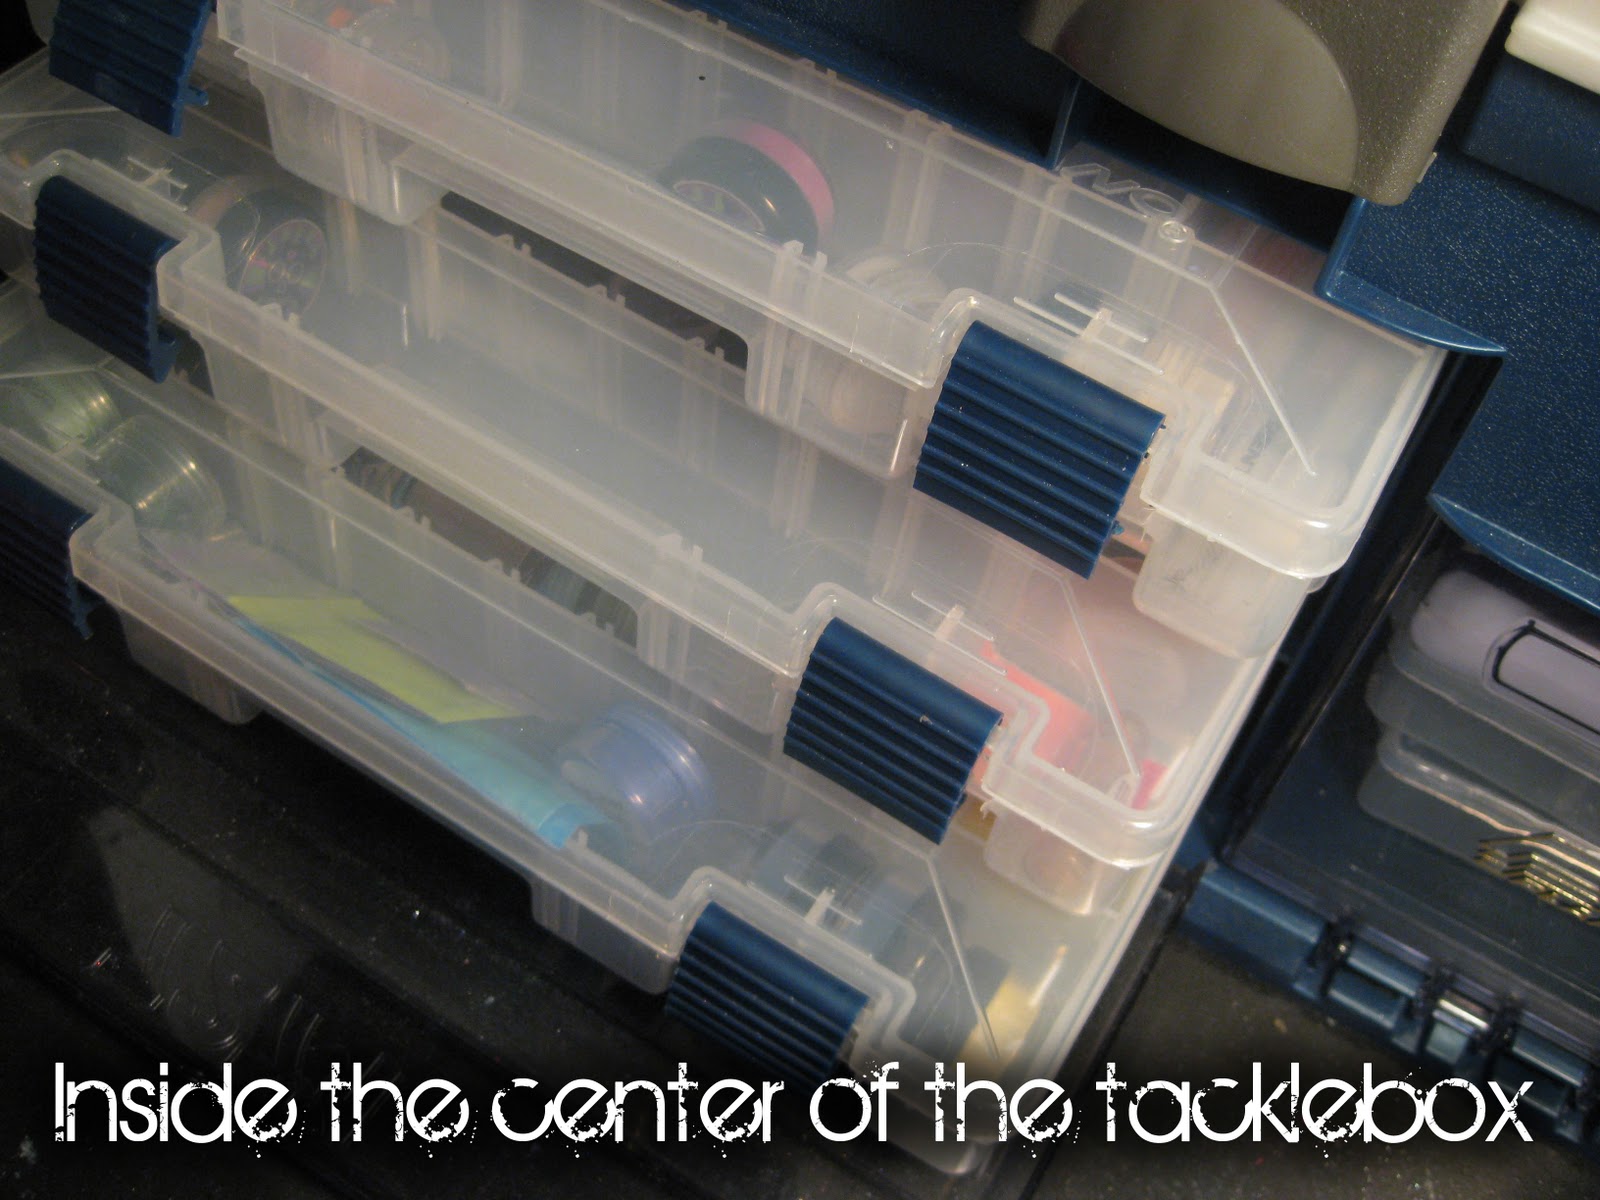
The center part of the box has three stackable, slide-able storage trays or boxes, each that flip closed. This area also has a "door" that keeps the trays from sliding out. (if you look at the first picture of my set up, you can see!)


I store my pigments on their sides, so I can see the colors easily. The tacklebox came with little dividers to split up the isles, but i ran out of room! Here, you can see my tray for greens, blues, and yellows. I absolutely adore the set up of this case. I am actually running out of room! The other boxes are also color coordinated. Maybe I will take pictures of the individual boxes one of these days. 


Moving on... next to my tacklebox is random crap I have yet to put away. xD


Here is my next little treasure. I found this guy (the green storage container) in walmart's clearance isle for less than $2. 


It fits perfectly under where I keep my hair stuff. It has two drawers, a top area with a flip-up lid, and little cups on the top as well.


In the top part, with the flip up lid, I keep all my lip stuff. Glosses, lip bombs, etc. it all goes in there. Right now I don't have much, so it all fits with ease!


The top drawer is dedicated to my face stuff. I rarely do anything to my face, so this is all I have. I have a few this-and-thats I never use, a Concrete Minerals eye primer (review soon!), mousse concealer (that I only use on my lips, ironically enough), a bronzer, and a mineral veil. 


The bottom drawer is for whatever. lol. i have a few LA Colors pallets I collected, a few frankened bottles of nail polish (I actually keep most of my polish at the boyfriends house, oddly enough), my Salon Effects nail decals, an Ulta pressed shadow, and my beloved Polyester Bride shadow from Urban Decay. 


Here is the top part of the storage thing. Since it is under the shelf thinger, I cant really get to these things that easily. (i mean, its still easy, but i have to move the container out from under the shelf thing) I store my extra nose rings and kabuki brushes here. :)


And lastly: my hair/everything else shelf. 


Here is where I keep all my hair stuff: hair spray, serums, heat protective stuff, you name it. I also keep my deoderant, bandaids, makeup remover, scotch tape (for makeup), and perfume here, haha! I won't lose them that way. xD

Well, there you have it! You've just had a look into my morning routine... and the way my brain works! I know it may not be the prettiest vanity, but it works for me, AND it was extremely low budget! I love re-purposing old furniture and the like, and this seemed to work out perfectly. I love the design of this tackle box, because it fits all my pigments the way I want it to!

I should have my video on eyeliner up tomorrow! Its about waterlining, and a cheater way to tightline your eye. ;)

Hope you enjoyed! <3