Tuesday, December 28, 2010

Helpful Hints - Definitions

So, I'm going to make an effort to start posting fully-labeled eye shadow photos as well as photo and video tutorials. I know many of you are familiar with these terms, but I want be geared toward the people that don't necessarily know a ton about makeup too!

These are terms that I will likely reference frequently, so study up! ;)


lid area - the most common place for shadow to be applied, the "middle" if you will. 

natural crease - the naturally occurring fold of skin between your brow and lashline. Often times where shadow will "crease."

hollow - the deeper part of  your eye area, where the eyeball itself recedes back into the socket. Often times this will be in the same location as the natural crease, but not always, as you can see on me.

orbital bone - that edge of bone that marks the edge of the eye socket itself. Directly beneath the brow bone.

brow bone -the area of bone beneath the brow, sometimes referred to the highlight area.


Most of these terms are self explanitory, however, I just wanted to clarity "Duct."

Duct: This refers to the area of skin surrounding the natural tear duct of the eye; not the tear duct itself.


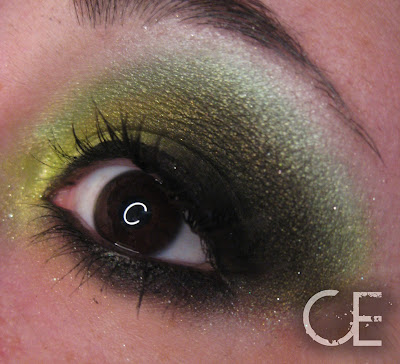
For the above look, I used Scaredy Cat Cosmetics "Chakra" on the lid, Glittersniffer Cosmetics "Detroit" on the hollow, Scaredy Cat "Teal Dear" on the orbital bone blended into Urban Decay's "Polyester Bride" on the brow bone. Glittersniffer's Julie on the duct.

Hope this helped!!

* I will be writing an official note on the use of Glittersniffer Cosmetics within the week. Until then, I do NOT endorse the use of their products. Use at your own risk. 

Sunday, December 26, 2010

Review - Scardey Cat Cosmetics

After a recent falling out with my previous pigment company, Glittersniffer Cosmetics, I have been on the hunt for new cosmetics companies... bad for me... GREAT for you!

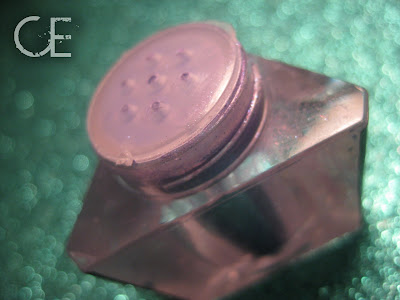
 As I was searching through Etsy.com, I stumbled across a small pigment company under the name of Scaredy Cat Cosmetics. I'm not going to lie. The first thing that drew me into their shop WASN'T the colors... it was the AWESOME packaging. As a graphic designer, these kick-ass little jars nearly made me wet myself. I HAD to have it. I did't care about the bills I had to pay. All I knew was that I adored these little things.... so I purchased SCC's "Chakra," seen below.


My shadow arrived 3 or 4 days after placing the order, tightly and safely packaged. No spillage. Now that's what I call FAST shipping. They were shipped in a BOX, not thrown into an envelope to fly around. The days between, however, I was conversing with the owner of the company: great communication. If you have any questions, I am pretty confident that Scaredy Cat will get back to you in a timely manner. 

Now, before I get my reviewing pants on:
LET ME TALK ABOUT THIS PACKAGING. 


The photos on Etsy are a little misleading, because the pots look HUGE, but as I was photographing these for the blog, I quickly found out that is it hard NOT to make look huge. The listing clearly states that they are 3 gram pots, so I have NO problem. Just my imagination getting a little carried away. ;P

As seen in the first image, two of the three sides have kick-ass designs coordinating with the color, and one side that is clear. I really liked this because you can see what color you are picking up, without having to turn it upside-down or all around.

Not only did I receive the color I ordered, I received a sample of "Teal Deer" - a snowy blue color - in a vial. 


Both the vial and the pot were both very professionally labeled - a plus in my book. One thing I didn't like? They both didn't have individual color labels. Now, you can obviously SEE the colors, but for obsessive people like me, the name on the pot or vial might help. 


Now, lets talk about the versatility of this nifty packaging. I HATE vials. This is nothing against SCC, lots of other cosmetics companies use vials too. I cant get a brush in the darn things, and when I tap out color, I (without fail) tap out too much and can't get the remaining pigment back in. >.<

As far as the pots go, I really like them. They are funky and fun, and the clear side makes it really easy to see the colors. I'm not sure about storage quite yet, but with my current storage system, it works. Based on your feedback and my own experiences, I will be sure to write a follow up on this aspect. :)

LETS TALK PIGMENTS!


This is in comparison to the standard 5 gram pots many of us are used to. The full size jars are a funky variation of a 3 gram jar, and hold 1.5-2 grams of product. The full size pots are available for $5 - a little expensive for 3 gram jars, but I think it is worth it. These things come PACKED full of pigment. Now, I wanted to make clear that the owner of the company did NOT know I was a reviewer until after my package was shipped out, so I didn't get any special "fill the pot completely" treatment. This is standard. The Trial Vials come packed full with 1/4 of  teaspoon of pigment, a good size for a sample, in my opinion. 


The pot came with a rubbery sifter, which I immediately removed. 


"Chakra" is a deep violet color, with a lot of turquoise glitter. The pigment itself is definately more shimmer than glitter. The pigment isn't clumpy or chunky. It is well mixed, and true to its color. It is HIGHLY pigmented, and goes on smoother than any other pigment I have ever used.


From left to right: Chakra applied with a clean brush on top of: nude primer, a white base, and a black base. 


Teal Dear is HIGHLY pigmented, and is purely shimmer. Not too much glitter in this one. It is a snowy light blue, with undertones of green. :)
From left to right: Teal Dear applied with a clean brush on top of: nude primer, a white base, and a black base.


The thing I like most about SCC: "All pigments are cruelty-free and free of parabens, fillers, fragrances, talc, bismuth oxychloride, and every other strange unpronounceable ingredient listed in store brand cosmetics. Many of our pigments are vegan. Every color is custom blended, never repackaged or created from pre-made bases."

Every listing lists wheter or not the pigment is vegan, and if it is safe for eyes, face, or both. 
Both pigments I purchased are vegan, and safe for eyes and face. 


The Positives:
*Great ship time
*Fabulous communication
*Shipped and packaged safely, no spills. In a BOX.
*Awesome packaging
*Pots filled FULL
*Clear side of pot for easy color viewing
*Highly pigmented, smooth application, colors as described on the website
*Most colors are vegan friendly, or otherwise stated. No lies. 

The Negatives:
* Vials. I HATE vials. 
*Color name not included on the actual pot of pigment
*Potential awkward storage?


Will I buy Scaredy Cat Cosmetics Again?
Yes. I will. Though their shop only offers a few colors, the quality is amazing. I can't wait for this shop to expand and offer some brighter colors in a larger variety! GOOD LUCK SCC! 


Tuesday, December 21, 2010

Versus: White Nail Polish

Alright. I was going to do black today, but I ran out. So, until next time, I bring you CHEAP white nail polish. 
I know this may not be a good comparison, but I am working with what I have! <3
All photos taken in indoor light, on account of the 9 inches of snow outside my door. 
I really would like to try OPI or any of the other enamels. but until then....

Going head-to-head today is:
Nina Ultra Pro Salon Formula 709


Versus:
Maybelline Express Finish in French Tip White 340


FIRST COAT:

both looked pretty milky, no big difference. :)

SECOND COAT:

Maybelline's 304 has a little bit more shine. Nina's 709 is looking pretty streaky, even after two coats. 

THIRD COAT:

Maybelline's 304  = major coverage difference! I liked the way Nina's 709 FELT on my nails, so I decided to give it *one* more coat, just to see if it was worth it. 

FOURTH COAT:

I could have given it ANOTHER coat, but I figured by this time I could declare a winner! Well, much to my dismay, I had no luck with the Nina's 706. The streaks stayed, and the polish was rather matte. I like shine!!! Maybelline's 304 felt heavier on my nails, but I will take that over streaks. Both of these polishes hover around the same price, and are available at most drug stores! <3

Attempting a shine comparison (click for enlarged version):

Got a "VERSUS" you are interested in seeing? let me know! <3

Eye of the Day - 3 Wizard of Oz


Wizard of Oz inspired shadow!
"Wicked Witch"


I used:

Glittersniffer's Zombie Girl, Deliciously Haunted, Radiation, My Monster, Flickr
Ulta's Galaxy
Urban Decay's Polyester Bride

OVER NYX MILK

Monday, December 20, 2010

My Two Cents & Mini Review - NYX Jumbo Pencils


Oh... where to begin?

When I first started using loose pigments, I bought my very first tube of ELF eye primer, and went to work. Much to my dismay, the colors of the pigment turned out looking NOTHING like the pictures I had seen online. I could not get these colors to look bright... at all: I was so upset that I had wasted my money. 

But then... a light from above told me to try NYX jumbo pencils. THESE have been my savior. It really makes your eyeshadow stick to your eye, giving you extra color insurance... and they are SO creamy and luscious. Many girls that use NYX Jumbo pencils use them as a base for their eyeshadows - loose OR pressed. A base goes on after the eye primer of your choice, yet before the shadow itself. :) Two of the most popular colors are black and white... better known as Milk and Black Bean, however, NYX offers these bases in a LARGE variety of colors. You can check them out here http://www.nyxcosmetics.com/index.php?pf=JEP

So Eige, what jumbo pencils do YOU own... and what do you think of them?

For starters, I only own what I could afford. I own 4 colors: Milk, Black Bean, Purple Velvet, and Cottage Cheese. :)


Milk: I use this one more than ANY of my other jumbo pencils. this color REALLY makes your shadows bright, and makes them POP against almost any skin tone. It is really creamy, but not oily.  I will put a tutorial up on how to use these in the next few weeks! but in short, you "color" it on your eye like a crayon, then blend with your finger!  


Black Bean... eh. Mine is a little on the oily side. Black is intimidating to a lot of people, and this isn't an exception. However, once you get the hang of it, it can really make a difference.... its a must have for smokey eyes!! <3 


Cottage Cheese is the white pearl. Not oily at all! It's not opaque as some others, but it really puts that sparkle into your look. :) For some reason, this one makes my pigments "crackly"... but it could be something I am doing wrong? Anyone else have the problem?


Purple Velvet. *sigh* To be perfectly honest, I haven't really gotten the hang of this one. It's a near blackish purple... once I have mastered it, I will be sure to let you guys know! <3

So Eige, give us the bad news. 

Well, to be honest, there isn't much I can criticize! I have only encountered a few issues, one of which was my fault. I have a really bad habit of pushing the cap on too hard... breaking the cap... and shoving product into the cap, thus, wasting it (see below). The solution to the problem is depotting the sticks....(picture tutorial... coming up!), which allows you to use ALL of the product without stupid stuff like this happening. PLEASE CLICK ON THE PICTURE FOR FULL SIZE! <3


The only other issue I have had is... when you go to sharpen the pencils, the edges of the plastic get jagged. I always forget about this, and end up stabbing my eyelids. Again, depotting the sticks would solve this problem... or just paying attention to whether or not you need to sharpen your pencil... lol!


Would I buy this again?
Absolutely. These add SO much dimension to your shadows.They are really easy to use, creamy, and wonderful. They give GREAT coverage, and last a long time! The few problems they have are just my own stupid mistakes, and can be avoided by depotting if they become too much of a problem. 

Here is a picture of ONE pigment - Glittersniffer's Delerious - with 2 different bases. The first is on Milk, the second is on Black Bean, and the last is bare. :)


... and thats my two cents!!! <3


BUT WHY PAY FULL PRICE??!?
I buy ALL my NYX pencils off of ebay for about half price... never used or opened! For example.. here is a bid for 2 - any color... for about the same price as 1 in stores. o.0 http://cgi.ebay.com/2-NYX-JUMBO-EYE-PENCILS-Pick-Your-Colors-ANY-2-COLOR-/250685046135?pt=US_Makeup_Eyes&hash=item3a5dfe3d77

Eye of the Day - 2


Colors Used: 

Glittersniffer Cosmetics' Zombie Girl, Mobster, Jack, All Star Purple, Julie, and Jellyfish.
Urban Decay's Polyester Bride as a highlight.

OVER NYX's JUMBO PENCIL IN MILK :)

Sunday, December 19, 2010

Eye of the Day - 1


Well. There you have it. My first EOTD. I'm kind of in a rush, so no closed-eye photos. I promise take more time on the ones to come, I have a lot in store.... so BE READY!! <3

I used: 
Glilttersniffer Cosmetics' Mobster, Jack, Julie, and All Star Purple
Virus Insanity's Flash
Urban Decay's Polyester Bride

OVER NYX's JUMBO PENCIL IN MILK :)


Edit: One more picture!


My Two Cents - Black Hair Dye

Welcome to the "chatter" section of my blog! These aren't necessarily reviews, but more or less options, random tips, common questions, and whatever comes into of my mind about a particular product. ^.^ 

For this edition of " My Two Cents"... I bring you: Black hair dye!


Ever since I was 14 or so, I have been on a streak of dying my hair ALL sorts of colors. For the past year or so, I have kept my hair black and purple, which has, I guess, become my "signature" look, lol. (I'll talk about the purple within the next week... promise!) Fact: I naturally have really dark hair, so I don't have to redye it all that often. In fact, I can't even tell when my roots start to show. Anyways, over the past year I have tried numerous dyes: expensive, cheap, 10 minutes, long wait, you name it. 

I'm going to be perfectly honest with you. I really, really don't prefer the expensive dyes. I bought Clairol's Perfect 10 dye (one of the most expensive drug store dyes) in two different blacks. (One of 'em is below) Sure, I loved the fact that it only took 10 minutes and had an awesome applicator, but dude. It washed out within a few weeks. Gave me a sad. :(


So Eige, what WOULD you recommend?


Well, I have two favorites. Revlon's ColorSilk 10, and Garnier Herbashine 10. Revlon's is the cheapest dye they had at the store (about $4 after tax)... and I love it. Garnier's is kick-ass too, but a little more expensive (about $6 after tax). Garnier's smells MUCH better (and makes me feel like a mad scientist mixing up all the oils for the dye), but they really both get me that BLACK I am looking for. So there's my two cents. :)


Helpful Hints for ALL hair dye:
I am by no means a pro, these are just things I have picked up over the years. :)

Have someone help you if you are dying your whole head. This isn't necessary, but it helps to avoid undyed patches and getting dye all over EVERYTHING.

- Follow the directions. With some of these dyes, getting creative might lead to explosions, death, and destruction.

- As with all things that have capabilities of staining everything in sight, wear clothing you don't particularily care about, and have an assigned "hair dying towel" for your hair just in case your hair wasn't completely rid of dye/run off

- put vasoline around your hair line and on your ears for easy clean up.  :)

- spot check for allergies if you have never used the dye before.

- Dye your hair over slightly dirty hair. For AGES, people have been debating over when the best time to dye your hair is. Dirty? Clean? Well, survey says: IN BETWEEN. When you wash your hair, you rid your follicles of natural oil and dirt. These oils protect your hair and scalp from the damaging effects of dye. However, if your hair is too dirty (havent showered in 3 weeks and used an entire bottle of hair spray), these oils might not allow the dye to take as efficiently. My rule of thumb is that you shouldn't have washed your hair within the past 12 hours. Simple as that.

And lastly, SAVE THESE:


- The top part of the box with an image of the color, the brand name, and the color name. Even if you HATED the color, keep it. (I keep all mine in a baggie.) Write on the back what you liked about the color, what you hated, etc. For example: "A little too on the red side for my liking." This will help you to shop for new dyes next time around, or to make sure you remember what dye you really want to purchase again.

- Don't write reviews WHILE your boyfriend is dying your hair. They have a tendency to flick dye at the screen.

Well, there you have it.
Sometime within the next week I will have a post on UN-natural colored hair dyes and the bleaching process.  :) fun fun fun!

Saturday, December 18, 2010

Review - Precision Lash Adhesive


Well, here you have it. My first product review! I will probably be too wordy here at first, so sorry in advance! Unfortunately, this isn't an "omg have to have it!" sort of review. And I will tell you why:

After all the Halloween clearance sales, I recently took up a fascination with the over-the-top false eyelashes. Long, super-think, rind stones, you name it. I ended up buying a large lot of falsies off ebay, and was super stoked to use them. One problem: no glue. I went to a local drug store and purchased Revlon's Precision Lash Adhesive for roughly $5. The adhesive comes in the standard double-sided plastic packaging with instructions and details printed on a cardstock insert. The packaging was labeled "eco-friendly," which gave me a happy. :)

Okay, first off, I really liked the fact that the tube was hard plastic. I cannot tell you how many tubes I have accidentally squeezed too much product out of. One of the negatives of the hard plastic bottle is that you don't have the opportunity to get the very last drops of product out of the bottle, but for me; I personally waste more product over-squeezing the product all over my fingers, so I could live with it. Another HUGE positive is that this formula is latex free. I don't personally have latex allergies, but I know that many people do. The adhesive did make my eyes water a bit, however, not badly. Also, this formula also didn't smell half as foul as other formulas I have used in the past. 

At first I was a little confused by the new brush applicator, but immediately fell in love with it. It is precise, and allows you to put on a smooth and even coat of product on to the lash band with ease. No gloppy crap. The adhesive brushes on a pretty bright blue, but DOES dry clear. To be honest, I think the awesome color made the waiting 20 seconds for the glue to become tacky go by faster. Or maybe I am just easily amused. 

My favorite thing about this adhesive is: IT WORKS. It's comfortable and it stays forever.

But Eige, it sounds like you really liked this product! Why did you say it wasn't a "must have?"

One major problem... THIS:


I'm not sure what it is... but the product almost explodes out the top when you go to put the wand back in the bottle. This could be something I am doing wrong, but I haven't figured it out yet. It actually feels like there is built up pressure in the bottle. Because of this, the bottle gets sticky and gross - quickly. Even with washing the exterior of the bottle off after every use, it still got pretty nasty. I would come back to find even MORE glue oozing out of the top, or would have it explode again after reopening the bottle. not fun.  If there is a trick to this I would love to know, since I loved the glue.

The Positives:
It's affordable: $5 for .17 fl. oz. (5g bottle)
Hard plastic bottle.
It dries clear, and stays like a pro.
It's latex free!
Forgot to mention: it is waterproof.
Easy to apply & fast dry.
Doesn't smell like a homeless man.

The Negatives:
Made my eyes water a little, but it was tolerable.
It oozes all over everything, and in my case, covering a nearby lip gloss in lash glue.


Will I buy it again?
Possibly? Will I buy Revlon again? Yes. I loved the glue itself, I just wish it didn't self destruct. I will probably end up keeping the brush to use with other products, just because I loved it so much. :)

Friday, December 17, 2010

Introductions!


Hey guys, this is a terrible camera phone photo of myself!
The name’s Christine Eige. Im the girl addicted to school, dinos, video games, and makeup. Im dark, opinionated, emotional, and ready to tell you what i think. 
This blog will hopefully be dedicated to a personal 365 makeup photo journal, along with special tutorials, reviews, swatches, and tips , tricks, and EVERYTHING in between! HOWEVER, i am not going to be limited to makeup. i want to review hair dyes, nail polish, piercing hygiene, and everything else i can think of. :D


i generally go BOLD or go home. :) cool colors are my thing, but i WILL be branching out just for you guys. Hopefully this will be a learning process for me, and fun for everyone! <3
About the girl: i am a graphic designer and full time student by day, and a free lance artist by night. if you have deviantart, you can find me here: http://christine-eige.deviantart.com
I am DIRT poor, struggling to get  by day to day. I will be reviewing products that i encounter or already have, but wont be able to go out and buy a bunch of new ones to review JUST for the sake of reviewing. :( but NO WORRIES! i will mix it up and keep it exciting! <3